0
£0.00
0 items

By Chris Myers
I have been teaching clinicians to carry out ultrasound guided injections both on our cadaveric injection course and in their own workplace (on-site teaching) for many years. This experience has been invaluable to help clinicians get started with ultrasound guided injections to ensure an accurate and effective injection which is comfortable for the client.
I feel there are some really easy things you can do to improve your technique; particularly to improve your needle visualisation to help build your confidence.
Here are our SMUG top 10 tips to improve your guided injections:
Tip 1: Start with the simple injections
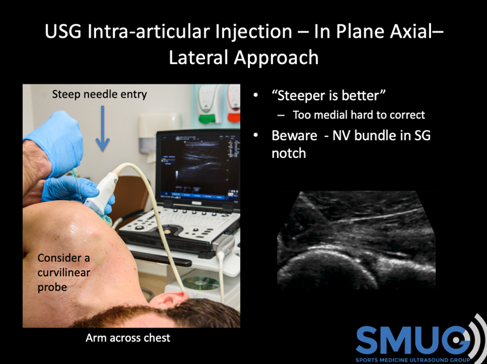
Start with the simple injections where you can use an in-plane approach and the needle can be inserted at less than 30° (ideally parallel to the probe as this will allow easy visualisation of the needle). Therefore, I would suggest the easiest injections to start with are the knee (supero-lateral approach), the acromioclavicular joint and the subacromial bursa. For this reason, we cover these injections first on our guided injection courses. The deeper injections such as intra-articular hip, shoulder, lateral hip (trochanteric bursal) and proximal hamstrings injections are deeper and so it is harder to visualise the needle.
From a personal perspective I was working as an Extended Scope Physiotherapist (ESP) and seeing lots of arthritic knees. Although the research would show that most unguided injections (80-90%) are injected successfully into the knee joint I carried out all my knee injections guided as a way of practicing the procedure. This helped me a lot and was an excellent way of improving my probe skills, needle visualisation and more importantly my confidence in the process.
Tip 2: - Let’s play darts!!!
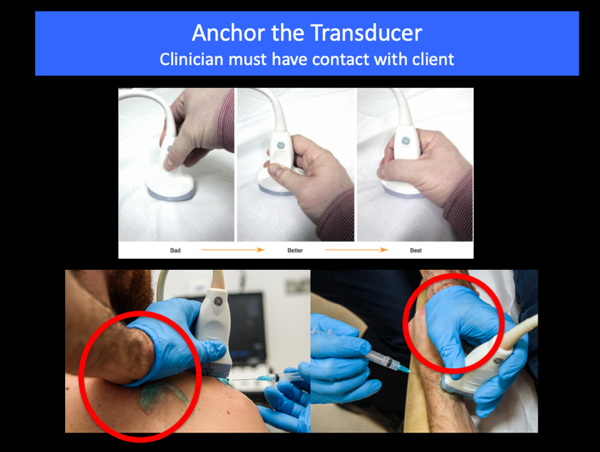
When I am supervising injections and clinicians cannot visualise their needle approximately 80% of the time it is very simple why! They do not insert the needle in the middle of the probe – even being 1mm to the side can result in you not seeing the needle.
When playing darts, the player lines their eye up behind the dart to ensure the best accuracy – why not do this for injections!

Here are 2 tips to getting this right and improve your needle visualisation:
Tip 3: - Don’t let the client see the screen
Certainly, for beginners I would advise you try to position the client so they cannot see the screen. In the past for shoulders, I had the patient sitting with me standing behind the patient with the ultrasound screen in front of the patient. There are two reasons why I would suggest that the patient should not see the screen. First of all, if you can’t see the needle on the screen then neither can the patient. The client will be expecting a ‘guided’ injection and may become a little anxious if they cannot see the needle, but they can feel you inserting it. They may question what is happening and this won’t help your confidence!
The other reason is I have had two occasions where because the patient can see the screen and the needle, they have fainted. This is obviously not very pleasant for them, or you. It is certainly inconvenient if you have a busy list!! I would, therefore, suggest that the patient does not have a clear view of the screen to put less pressure on yourself and to reduce the risk of them fainting!
Tip 4: Use lying (supine) and side lying positions for the client when possible
I will always try to position the client, when possible, supine or side lying for most injections. I used to carry out quite a few injections with the client sitting, but when patients have a large base of support their bodies are generally more relaxed and less tense. Consequently, they appear less anxious and anecdotally they seem to experience less pain with the injection. They are also less likely to faint. If the patient is relaxed, then you are going to be more relaxed and you are more likely to perform the procedure successfully.
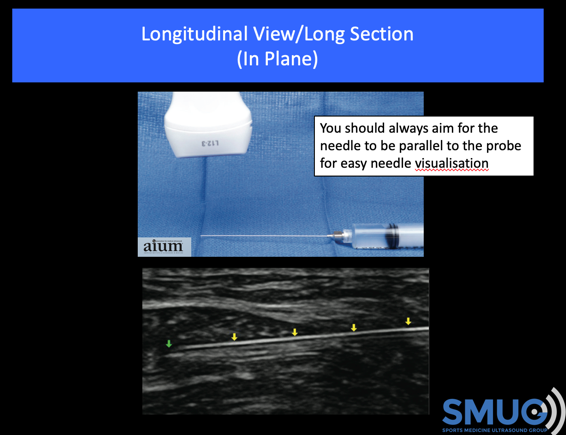
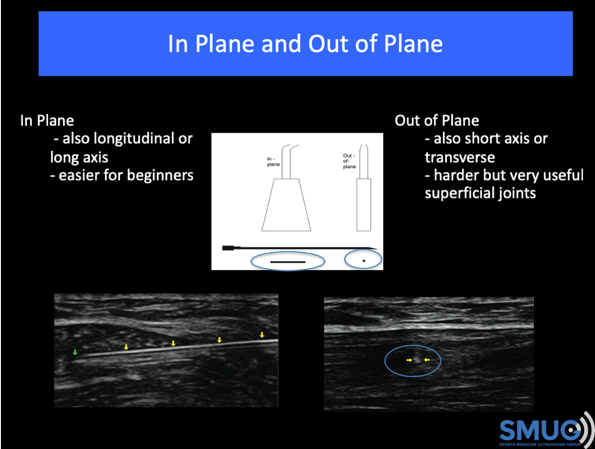
Tip 5: Start with in-plane injections
Generally carrying out in-plane injections is easier than carrying out out-of-plane injections. Certainly, for the first six months of my training, I only used an in-plane approach as I was more comfortable carrying these out and it helped to build my confidence. As I became more confident, using out-of-plane injections were very useful. Out-of-plane injections can be very useful as they give you more options with smaller joints and soft tissue structures but are more difficult to carry out.
Tip 6: Needle choice and needle visualisation
Most machines have needle visualisation options and when you are getting started it can be useful to use this option. Most experienced practitioners do not use needle visualisation, but it can be useful at first. The other thing to consider is using an echogenic needle (http://pajunkusa.com/sonocannula.php), which means that even when using a fairly acute angle, >40°you can still see the needle very clearly. These needles are more expensive but are a great way of gaining confidence. Most experienced practitioners do not use these as you are able to see the needle adequately with good technique, but at the beginning every little helps!
Tip 7: Use separate syringes!
I would advise if you are going to inject local anaesthetic and steroid that you inject them separately i.e. in different syringes but one needle insertion. This will mean that before the injection you will need to draw up the local anaesthetic and steroid into separate syringes. Insert the needle first with the local anaesthetic syringe attached and when you feel the needle is accurately positioned in the target tissue, inject a small amount to ensure the fluid goes into the desired area. If the local is in the correct target then administer the rest of the anaesthetic. Once you are confident the local has been administered in the target tissue then I will change the syringe, re-check needle location with the ultrasound and then inject the steroid. I think this is very important to give some pain relief during and after the injection and to ensure that you are in the correct target before injecting the steroid. You don’t want to waste any steroid outside the target tissue!! This technique is also likely to reduce your chance of unwanted skin side effects such as depigmentation.
Tip 8: Save an image of your needle position and/or injection or save a video of the procedure.
You should always be confident that you are in the target tissue before you carry out the injection. I would suggest that you take an image of the needle in the correct position or record a video of the procedure. Some clinicians will switch on the power doppler just before you inject and this allows you to see the movement of the injectable going into the joint/tissue. This provides good evidence of needle location and the location of the injectate. This is very important from a medico-legal perspective.
Tip 9: How do you know when you are successfully injecting into the joint?
The question I often get is how do you know if the injection as gone correctly into the joint. This is generally quite straightforward – there are three things to check:
1/ Your needle tip should be within the joint – this doesn’t mean you have to be between the bones you just have to be under the joint capsule.
2/ When you inject there should be very low pressure in the syringe i.e. it should be easy to push the plunger down with very little or no pressure at all.
3/ When you inject, the injectable should flow away from the needle and you should not see it accumulate around the tip of the needle.
Tip 10: You must prove competency!
It is essential that you have undertaken the adequate amount of training and supervision in ultrasound guided injections to provide evidence that you are competent. Attending the correct courses and having enough supervised injections on a variety of joints/soft tissues is part of this process. The exact specifics of what constitutes competency will dependent on the local policy in your clinic/trust. As an example, when I was in the NHS, to begin injecting unsupervised I was expected to have passed a post graduate injection module, achieved a diagnostic ultrasound qualification and carried out thirty supervised ultrasound guided injections. These were signed off with feedback from my supervisor.
It is an essential that as part of proving your competency that you attend the correct course for you. In collaboration with the University of East London (UEL) we run the only Post-Graduate Certificate qualification in ‘Ultrasound Guided Injections’ in the UK. We also run our ultrasound guided two-day cadaveric injection course which gives you lots of opportunity to scan and inject on the cadavers under the close supervision of our expert tutors. Both courses would need to be followed up with supervised injections in your own practice.
Once you have achieved competency, it doesn’t stop there, you then need to ensure you are maintaining your competency. This involves getting enough injection numbers through the clinic every week. If you are not getting enough, it is very hard to maintain your skills and competency. This is a consideration if you only work in private practice.
I hope you have found this blog useful and good luck with your injections! If you have any questions or would like me to expand on any of these points please do not hesitate to contact me at chris@ultrasoundtraining.co.uk. Hopefully we will see you on one of our courses soon!