0
£0.00
0 items

10 Top Tips from Chris Myers (Co-Faculty Lead SMUG)
Whether you are a radiologist, sports doctor, physiotherapist, rheumatologist, orthopaedic surgeon, osteopath, GP or sonographer here are our Top 10 Tips for learning how to get started in Musculoskeletal (MSK) Ultrasound.
1/ Get a machine!
You can’t learn how to play the guitar without a guitar! Diagnostic ultrasound is a motor skill and it takes time to learn. It is like learning to play a musical instrument; you must pick it up regularly and practise. We would advise that you have at least two scanning sessions a week. But to get good at ultrasound takes lots of self-study, so if you can a take a machine home at the weekend or in the evening and scan yourself, family members and friends it is a great way of making progress.

2/ Don’t buy a cheap (rubbish) machine
One of the biggest barriers to learning how to get started in Musculoskeletal (MSK) Ultrasound is the cost of the equipment. Ultrasound machines are expensive especially if you are buying it yourself. It is important you don’t just buy the cheapest machine on the market! Ultrasound is an operator-dependent modality, but it is also machine-dependent. If you have a poor quality, cheap machine with low frequency probes (less than 12MHz) learning to scan becomes far more challenging (it’s challenging enough with a good machine!). SMUG delegates get an exclusive discount on GE Healthcare machines (email us for more information info@ultrasoundtraining.co.uk). If you are spending less than £10,000 then ensure you test out the machine first and ideally compare it side by side with another machine. See co-faculty lead Rob Laus’s blog who has expanded more on this topic in a recent blog buying a machine.
3/ Scan ‘normals’!
Seeing pathology on ultrasound is very exciting and of course is the end goal. However, if you don’t have an appreciation of what normal anatomy (or the spectrum of ‘normal’) looks like it is very difficult to identify pathology. We advise that you initially scan lots of ‘normal’ and start to develop a ‘reference library’ of what ‘normal’ anatomy looks like. Try not to scan lots of elderly (by elderly I mean over 40!) as we know we get a lot of asymptomatic pathology in these clients and remember that obese clients are harder to scan. The ideal practise patient would be 18 or 19 and not overweight!

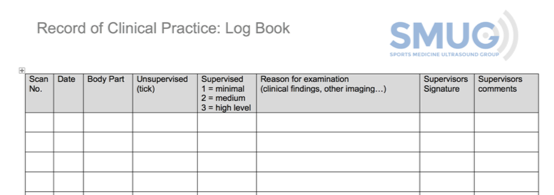
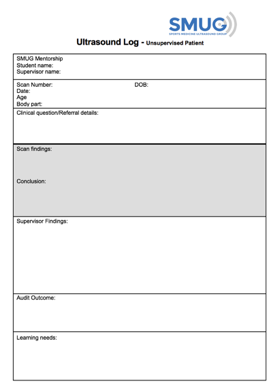
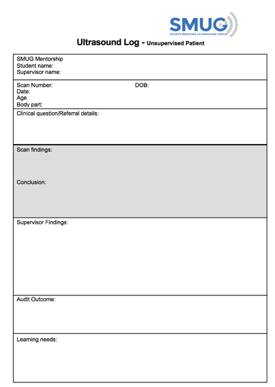
4/ Log your scans from Day 1
It is important to log your scans. This will help to structure your learning; reflect on scans and document evidence of your learning. Whatever your discipline you must be able to provide a portfolio of evidence. Don’t wait 6 months to develop your scanning skills and then start logging your scans. Most ultrasound learning pathways including our SMUG Mentorship Programme and PG Certificates allow you to log a certain number of ‘normal’ scans as part of your learning process.

5/ Spend time with other disciplines
Whatever your discipline, we can all learn from each other. As a physiotherapist I learnt a considerable amount in my training from spending time with a radiologist in a busy hospital in central London. It exposed me to a wide variety of pathology that I would not normally see in a physiotherapy clinic. Radiologists who have spent time in my clinic have commented on how I combine the scan with clinical assessment, carry out many dynamic tests and use sono-palpation to try and identify the pain-generating structure(s). However, whenever you spend time with someone else it is important to document your learning and reflect on the experience. This provides evidence of a broad learning experience.

6/ Get an ultrasound buddy
Learning musculoskeletal ultrasound is much easier if you have someone to practise with. When I was training there were three of us who all stayed behind after work and scanned each other, or if we had a non-attendance we would practise. We also met up some Saturday mornings away from the pressures of work. These were particularly useful sessions and the best way to learn. If you are in a practice on your own learning ultrasound can be a very isolating experience. We advise that you try to find people locally who also want to learn musculoskeletal ultrasound.
We have a Facebook Ultrasound Forum for those who have attended a SMUG course. This is an online community for clinicians using musculoskeletal ultrasound, whether a beginner or advanced. To join the group simply search in Facebook ‘SMUG Ultrasound Forum’ and request to join the group and we will approve the request.
7/ Take time developing your probe skills – remember this is a motor skill first!
We teach thousands of practitioners every year and I observe many clinicians who are very competent at scanning, but it is the probe skills that separate the good from the great! Many people can scan using protocols and produce clear images, but it is the ability of a clinician to scan a structure and follow it wherever it goes that really tests their probe skills and their ability to produce a clear image for diagnosis. Once you have the probe skills you just find it and follow it!
Here are some simple tasks you can do to skills to improve your probe skills:
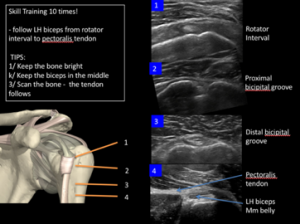
1/ Find the long head of biceps in transverse section in the bicipital groove and rotate into longitudinal section. You must keep the tendon in the middle of the screen as you rotate. Repeat 10 times (but ensure you keep the tendon in the middle, if not, stop and try again).
2/ Find the long head of biceps in transverse section in the bicipital groove and follow it from the pectoralis major tendon into the rotator interval – repeat 10 times. Remember: Keep the bone (humerus) bright throughout. As Mark Maybury, one of our tutors says “Keep the bone bright. Soft tissue right’. It’s a simple rule but is very important in MSK scanning as tendons often sit or wrap around bones.
![]()
3/ Find the medial nerve in the carpel tunnel and follow it proximally to just above the elbow. Ensure you tilt the probe to avoid anisotropy so you can see the ‘honeycomb’ appearance of the nerve and slide the probe on the skin forwards and backwards to keep the nerve in the middle. Whenever scanning a nerve ensure you use light probe pressure and lots of gel.
4/ Find the peroneus brevis tendon in transverse section just above the lateral malleolus. Remember brevis is closest to bone – ‘b’ and ‘b’ (easy to remember!). Follow the tendon keeping the bone and tendon bright as it wraps around the lateral malleolus. Continue to follow it distally until it attaches on the 5th metatarsal. It can get tricky to follow as it wraps around the bone. At this point the tendon changes direction (nearly 90°) so the probe position must reflect this. Key tips as it wraps around the bone - use lots of gel and keep the bone bright!
8/ Get your hands on some key resources
There are lots of free resources on the internet for both beginner and advanced levels. As a starting point for anyone wanting to learn diagnostic ultrasound we recommend you:
1/ Download the free ESSR guidelines for each joint print them in colour, laminate them and keep them in your clinic room. They give you a basic protocol to follow and cover the key anatomy for each joint. You can find them here:
Hip: https://essr.org/content-essr/uploads/2016/10/hip.pdf
Knee: https://essr.org/content-essr/uploads/2016/10/shoulder.pdf
Ankle: https://essr.org/content-essr/uploads/2016/10/ankle.pdf
Shoulder: https://essr.org/content-essr/uploads/2016/10/shoulder.pdf
Elbow: https://essr.org/content-essr/uploads/2016/10/elbow.pdf
Wrist: https://essr.org/content-essr/uploads/2016/10/wrist.pdf
2/ If you are going to buy a book, and we recommend that you do, buy the new version of Dr. Jon Jacobson’s book. He is one of the pioneers of musculoskeletal ultrasound with hundreds of publications. It is a great resource for beginners with clear illustrations and images. It also has over 300 narrated video clips.
You can buy the book here: Amazon: https://www.amazon.com/Fundamentals-Musculoskeletal-Ultrasound-3e-Radiology/dp/032344525X/ref=sr_1_2?s=books&ie=UTF8&qid=1501516767&sr=1-2&keywords=fundamentals+of+musculoskeletal+ultrasound
3/ Have a look on ‘You Tube’. This is a great free resource with some excellent videos. There are many pioneers in musculoskeletal ultrasound but do look out for these names; Carlos Martinoli, Jon Jacobson, Philippe Peetrons and Marnix Van Holsbeeck. I have seen these guys lecture many times and have always been very impressed. I would also recommend the lectures from Stephen Bird.
Here are some links to his videos:
Elbow: https://www.youtube.com/watch?v=MliEGHR3eDg
Ankle: https://www.youtube.com/watch?v=LyWj3sPs7Vw
9/ Audit your scans
Surgical correlation is the gold standard test for the diagnosis of most musculoskeletal conditions. All imaging techniques be it MRI, CT or diagnostic ultrasound have their limitations. Ultrasound is very operator-dependent and so the interpretation of the scans can vary from one clinician to the next. But who is right? Expert opinion is still a valuable tool to compare your scans too and that is why you are required to have a clinical supervisor for competency-based learning pathways. However, unless you follow up your scans with surgical correlation or MRI (bearing in mind MRI also has its diagnostic limitations), you may not know if your diagnosis was correct.
We recommend you follow-up at least 10% of your scans each year - even as an experienced sonographer. If you are a surgeon this can be quite a simple process as you can correlate your findings with your surgical observations. This is probably one of the reasons surgeons seem to pick up ultrasound relatively quickly. Most other clinicians can compare their findings with another expert, or to an MRI. This forms valuable feedback. If you have any discrepancies it is important to document them, reflect on why they occurred and implement a plan of action. The table below is one method of recording these discrepancies.

10/ Now get started
There is no time like the present!
It takes time to be proficient at ultrasound, so don’t delay!
We recommend you follow these top tips and get started with our 2-day Introduction Course in Musculoskeletal Ultrasound: www.ultrasoundtraining.co.uk/viewcourse/1/Introduction-to-Musculoskeletal-Ultrasound/)
If you have any questions, please feel free to email us at info@ultrasoundtraining.co.uk